Finally - the Bullitt begins! :-)

Create your project threads here if you prefer to keep them out of the regular forums

Moderator: Moderators

mungus
Mustang Star
Mustang Star
Posts: 523
Joined: Fri Jun 26, 2015 8:53 pm

Re: Finally - the Bullitt begins! :-)

Post by mungus »

Well now that the underside and engine bay / aprons are done, like a kid at Christmas I couldn't resist bolting on some shiny parts.
Probably not the right thing to do just yet, but I want it on its wheels (old trailer wheels for now) so I can roll it around the shop and trailer it for final painting. So on go my restored or new suspension and steering bits, and of course the fuel and brake lines.

I'll upload lots more photos soon. But for now here is the Brake Distribution block and Proportioning valve. I used a WCCC kit for the rebuild.
I was a little afraid that it was some kind of dark art, rebuilding these. As many folks just buy reproductions... However after watching WCCC's video I realized it was pretty basic stuff. Certainly a rebuild kit at $25-45 USD (NPD or WCCC) and letter postage, is a bit cheaper than $300++ for a knock off.

The car is a mixture of “concours-ish” restoration, and resto mod both for modern driving and as I’m echoing McQueen's upgrades.
(Konis. TT-D's, Shelby steering wheel etc). So perhaps call it a period correct resto modded car? As I’ve added hard to see modern upgrades like Pertronix, Roller cam, SCAT rods, Urethane bushes, Blue thunder intake, CJ carb, FPA headers Borgeson PS etc. You get the drift...

Speaking of which (drift), tyre choice is looming large, for now its either Cooper Cobras (rim savers?), or Vitour Galaxy GTs (RWL to the back). Have to mask and paint my TT-D's first. As the movie cars had Charcoal centres, not the black or grey offered by American Racing these days. Not looking forward to that one...

Image

Stand by for a photo bomb! :backflip:
Grumpy old git! 68’ S code Fastback
mungus
Mustang Star
Mustang Star
Posts: 523
Joined: Fri Jun 26, 2015 8:53 pm

Re: Finally - the Bullitt begins! :-)

Post by mungus »

So finally off the rotisserie. On axle stands and blocks for back up. decided to fit out the suspension, brakes and steering so its mobile. Coming together although a couple of upgrades I purchased have been disappointing. Firstly the urethane sway bar bushes. They are a crap fit as their brackets need to be chopped at one corner and the bolt holes are too sloppy to fit without big HD washers and longer bolts. Looks like its was to fit a multitude of cars, and not classic mustangs very well. I may come back to them later when I've got time to make them work better. For now I've restored the old brackets and fitted new OEM bushes. Likewise a set of Whiteline urethane leaf spring "sandwich" bushes. As supplied they won't fit (despite a nice video by "Bill" of CJ Pony Parts claiming to are sold ready to fit). Ozzie made too, so that's a shame. They fit the leaf pack snuggly and look OK on the bench, however to make them work you'd need to drill out the shock plate centres a lot and fit much longer U bolts. As our cars didn't have them as STD I'm leaving them off for now. Strike 2! Oddly enough CJ's Web shop picture shows only one bush being used per side (between the leaf pack and shock plate, whereas the Whiteline webstore shows both being used. (sandwich). Anyway later...

Anyway first pic, RHS suspension in. Shelby drop done and Koni's set to mid range dampening for now.

Image

Battery box and solenoid in (must have had a new front apron as there were no holes for that). Easy enough with a web search for location.

Image

Restored Booster, Borgeson PS unit & new OEM faithful M/C. Distribution valve etc and behind them all is tucked my Wilwood hydraulic clutch slave cylinder. New brake and fuel lines from Classic tube too. (required more fixing than I had hoped).

Image

Anyway started refitting the rear end yesterday evening. So hopefully that will all be tucked away today. :dance:
Grumpy old git! 68’ S code Fastback
hybrid
Mustang King
Mustang King
Posts: 9351
Joined: Tue Jul 27, 2010 2:13 pm
Contact:

Re: Finally - the Bullitt begins! :-)

Post by hybrid »

Everything is so clean :thumbs:
mungus
Mustang Star
Mustang Star
Posts: 523
Joined: Fri Jun 26, 2015 8:53 pm

Re: Finally - the Bullitt begins! :-)

Post by mungus »

Thanks, but try as I may the odd nick still appears...

Anyway onwards. Rear axle is in, steering systems in and slowly fitting out the engine bay with the stuff I won't be able to get to with the engine installed.
Fitted the little Wilwood hydraulic clutch reservoir. (part of the Modern Driveline TKO600 kit). Limited options for positioning, but this works for me. A pair of 1/4 UNC riv-nuts holding it to the firewall, with a 3/4" alloy spacer block to get the cap out where its reachable.

Spent today tidying up the places the rotisserie was bolted to and restoring the hand brake handle / ratchet. One of the only systems I hadn't already done... Came up nicely with a new SD handle and upgrading to a solid cable roller. The OEM paint on this part was a joke. So this time it should keep its looks a while longer. Media blasted, proper priming and decent coverage. :spoton:

Onward we plod.

Handbrake before...

Image

During.

Image

And after.

Image

Clutch slave reservoir etc.

Image

UPDATE: The Modern Driveline Hydraulic Clutch kit means insufficient room to mount the OEM E brake handle against the firewall. So I cut off the L shaped tags and MIG'd a wee 3mm plate to the end with a pair of 5/16 UNC studs tacked on. It allows you to run the OEM E brake handle using the same mounts by the steering column, by relocating the 2 studs about 15mm to being right under the end of the E brake ratchet / pulley housing.
Last edited by mungus on Sun Jan 07, 2024 11:54 am, edited 1 time in total.
Grumpy old git! 68’ S code Fastback
mungus
Mustang Star
Mustang Star
Posts: 523
Joined: Fri Jun 26, 2015 8:53 pm

Re: Finally - the Bullitt begins! :-)

Post by mungus »

And with that in mind I needed to tackle the dash / vent panel. Another tricky labour intensive bit. So all sanded and black etched and ready for some 2K metallic satin black mixed to the Ford spec.

Image

Image
Grumpy old git! 68’ S code Fastback
mungus
Mustang Star
Mustang Star
Posts: 523
Joined: Fri Jun 26, 2015 8:53 pm

Re: Finally - the Bullitt begins! :-)

Post by mungus »

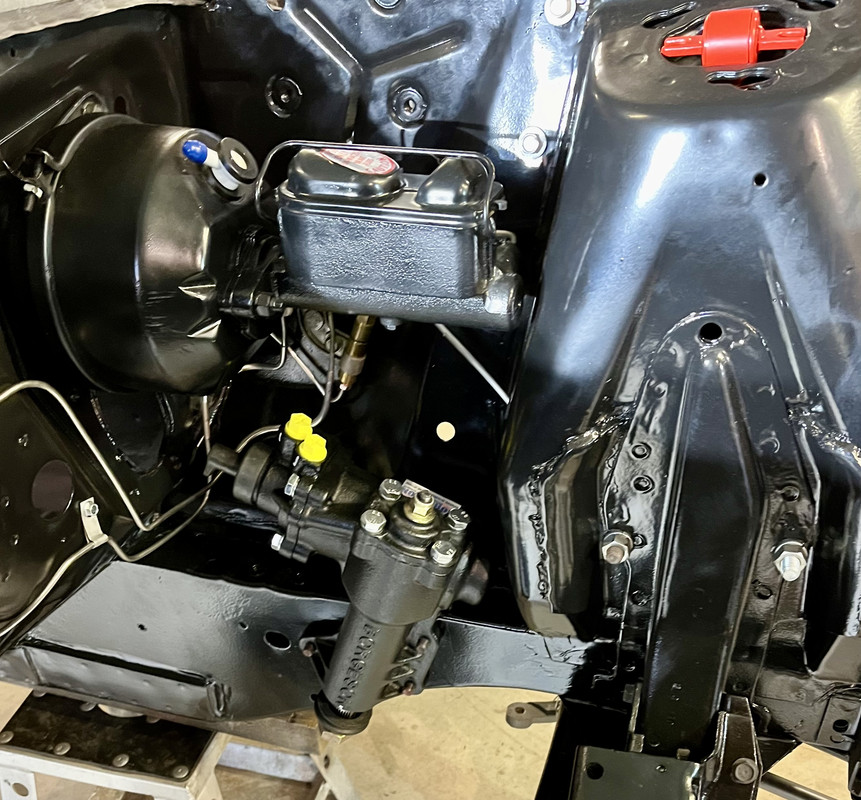
Well have done a fair bit since the last post. Fuel & brake lines and rear axle fitted. Engine bay fitted out, wiring harnesses mostly in, firewall insulation pad on, etc. What I'm sure is no surprise to more Mustang experienced people than I, is how many necessary fasteners are missing even when you've bought all the AMK "Master Kits"... :wbash:

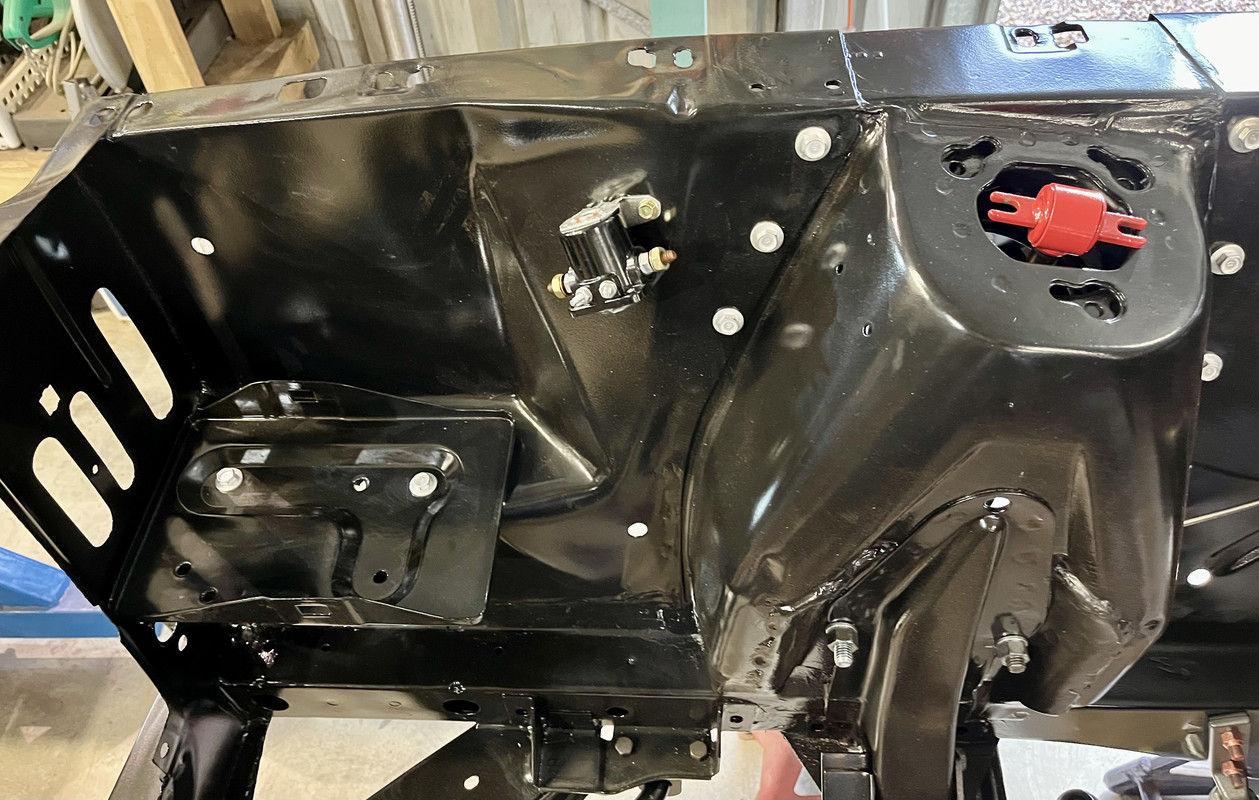
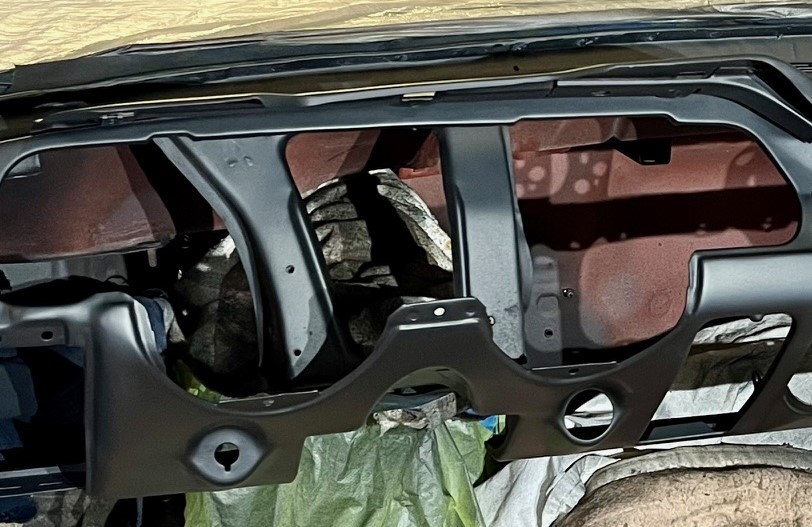
I wanted all screws located in the firewall in, as they all help hold in the insulation pad on etc. So I needed to install the Windshield Washer foot pump gizmo. Another sub-system I'd forgotten to tidy up along the way... Not fitting that delays trial fitting my "Perfect Fit" AC system's box under the dash. (something I'm keen to see).

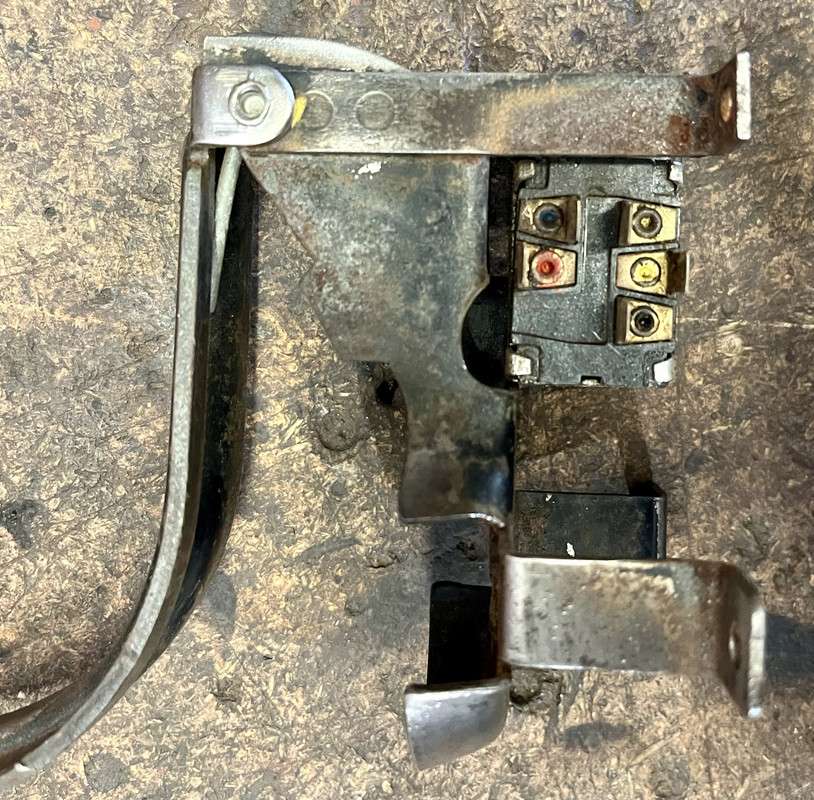
So into the foot washer pump. Only fitted in 1967 & 1968. A curious gadget as it brings its washer fluid inside the cabin so any leaks could cause wet carpets and eventually rust. An odd choice given previous (and subsequent) years had a simple electric pump. However I do like the way it provides an intermittent wiper function to add to the factory 2 speed system. For those unfamiliar, a quick dab on the pedal releases a sprung double pole switch, that makes one cycle of the wipers then parks them. They also squirt a decent amount of washer fluid too, but on that score I'd rather have an electric pump foreword of the firewall somewhere... And yes there are several types of electric pump kits available, however they don't provide a discreet switch, and some look messy, so I decided to go stock for now.

I thought of one way which combines stock appearance and an electric pump that I may build one day. Using a simple starter push button switch mounted through the foot pump bellow's base plate, using a couple of big fender washers. That can activate a discreet electric pump mounted near the bottle, yet retain the wiper switching function. Anyway I digress.

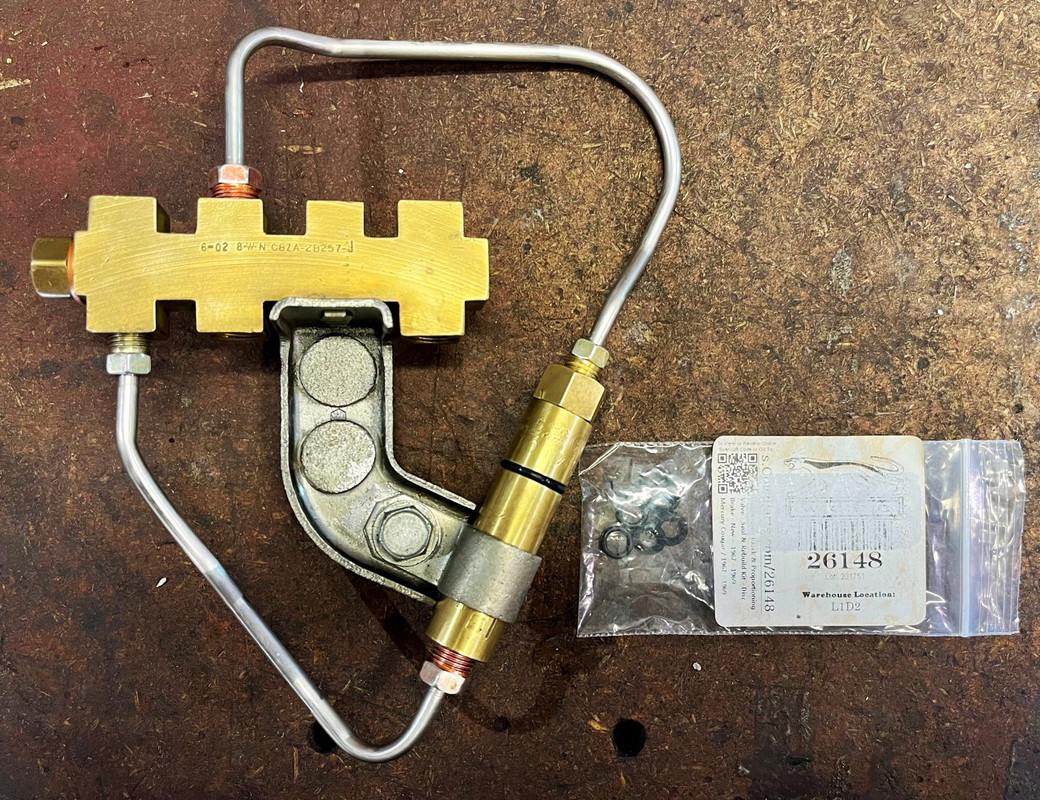
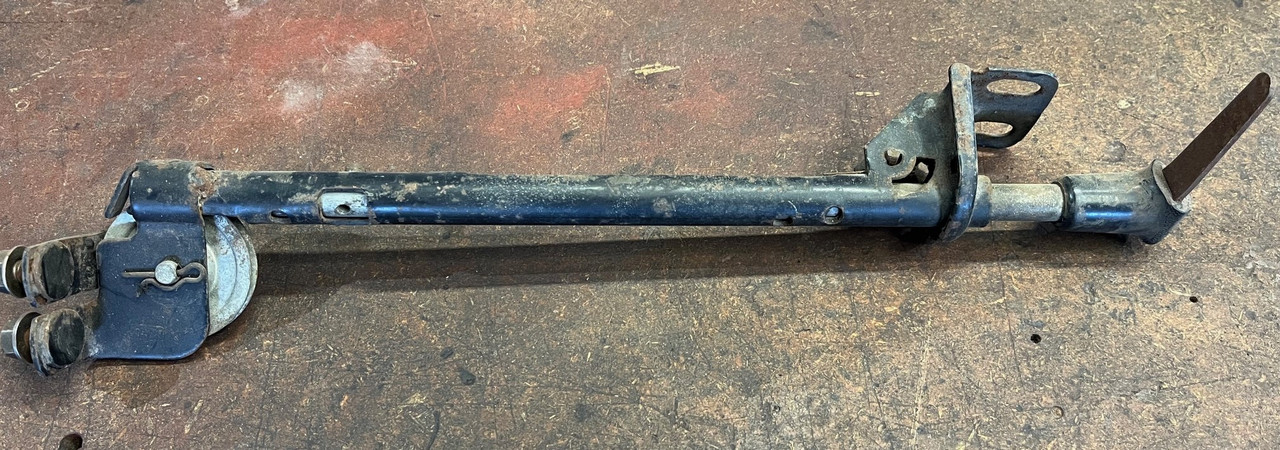
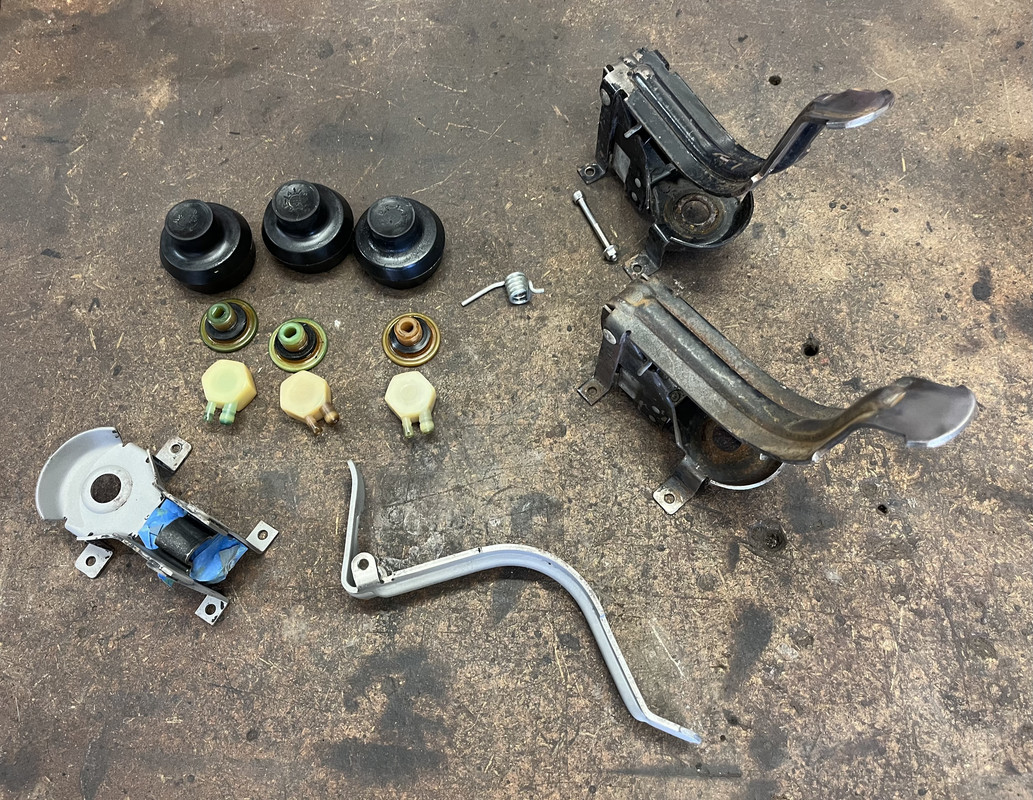
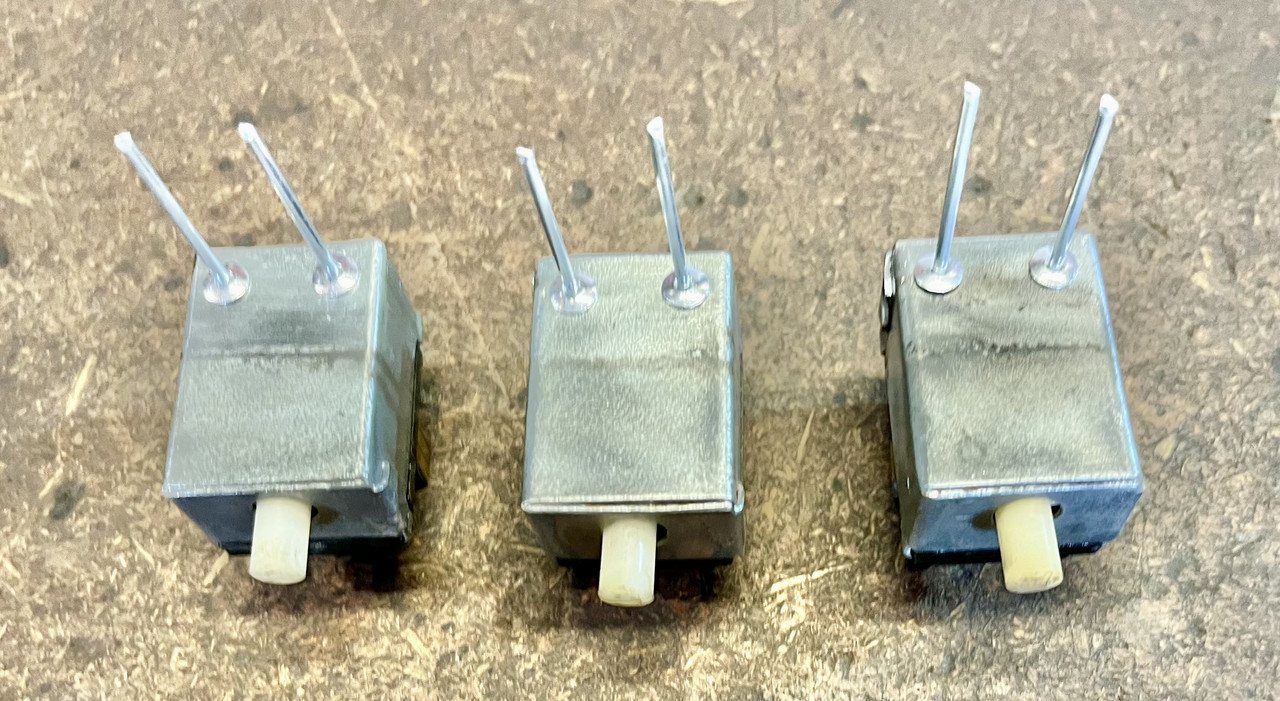
So heres some photos. I had 3 washer units to do. All with ratty paint / surface rust, 2 with errr "crunchy" sounding switch units, and one that leaked from under the rubber bellows. It was easy to test them using a wee funnel held in my vice and some old tubing. One had its arm's pivot point rivet squashed end, half knocked off. So I decided to explore the unit a bit by removing the rivet. They use a semi tubular 3/16 rivet with about 42mm under the head, semi eclipse style head. These are easy to buy except these days only in the US or the PRC it seems. Which means blowing $20-30 AUD for a pack of 10 when only 1 is needed... Bugger! Anyway an M5 stainless cap screw replaced that for now. Far better fastener anyway. I may pick some of the rivets up when I'm back in the states for work. Just to get that one OEM correct. Postage being 1/2 the cost... Anyway masked and media blasted ready for priming. :bananadance:

Image

Image

I removed the switches, as they all needed to be inspected and cleaned.

Image

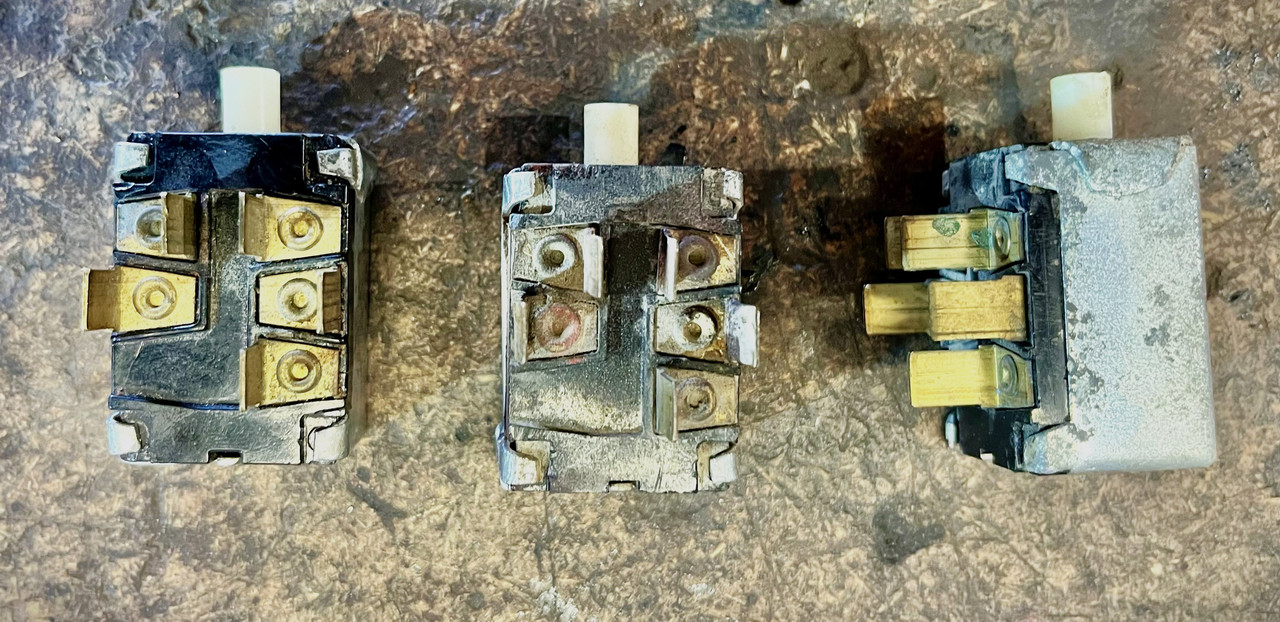
They revealed grease on the contacts so that was replaced with new dielectric grease. 2 were quite dirty inside. One with sand (beach car?). Anyway all clean now, lubed and tested. I believe you need this switch in place to allow the wipers to park regardless of whether you have a functional pump. You can buy new contact kits in the USA (WCCC have them for $30 USD).

Image

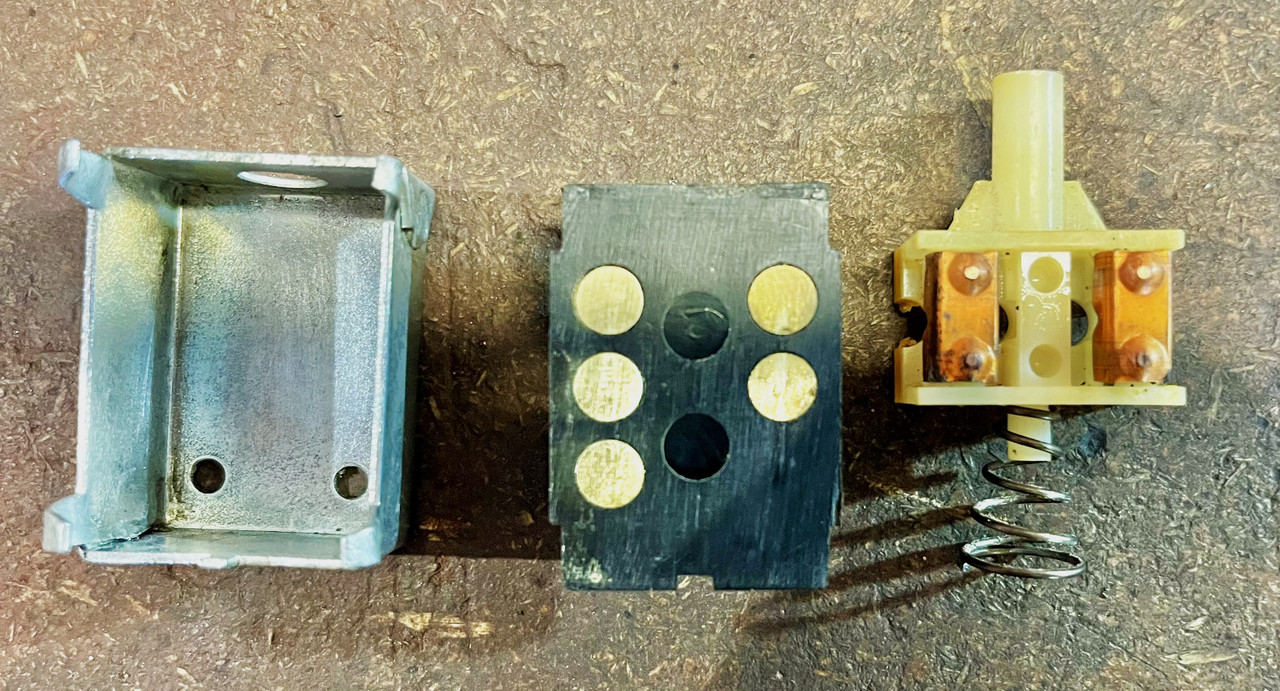
They were attached to the frames with little semi tubular rivets, so the cases were likely attached prior to the insides being added.
Re-attached using little pop rivets. Not 100% OEM looking but basically invisible anyway and if you're really fussed you could always fill the shank hole in the head with a dab of knifing putty and touch up with a silver paint pen. These switches were not at all sealed from dirt, with a big gap around the nylon plunger. Hence the much I found inside 2 of them... I found what looked like the remains of a thin foam pad around one switch's plunger hole. So perhaps when new that sealed around the plunger to keep dirt out. I'll look for some adhesive rubber / foam to replicate that.

Image

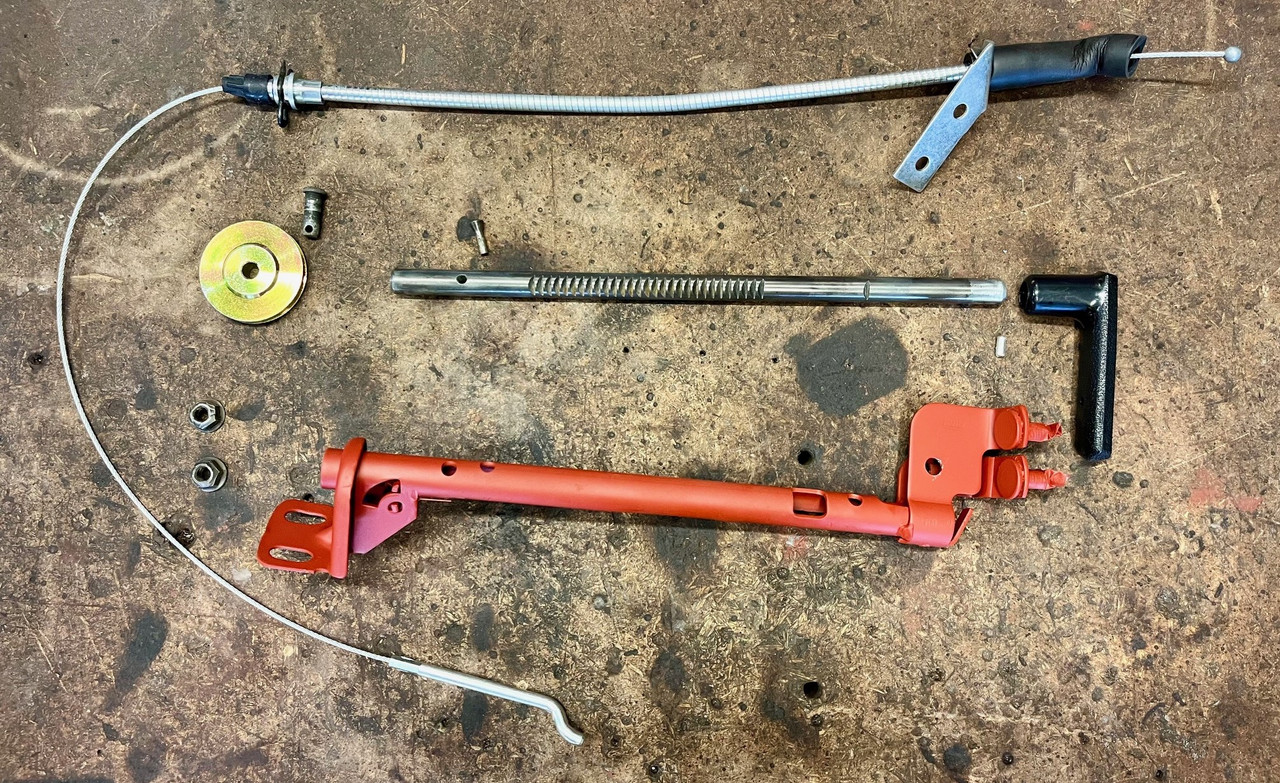
Anyway on to the guts of them. The rubber bellows etc. They can split and leak (available for around $25-35 AUD) but in my case the bellows were all good, and the leak on 1 was from around the threaded shaft of the nylon plinth they mount over. They used what appears to have been a standard rubber tap washer to fill the gap between the OD of the base of the shaft to the ID of the hole in the bellows. Anyway here they are apart.

Image

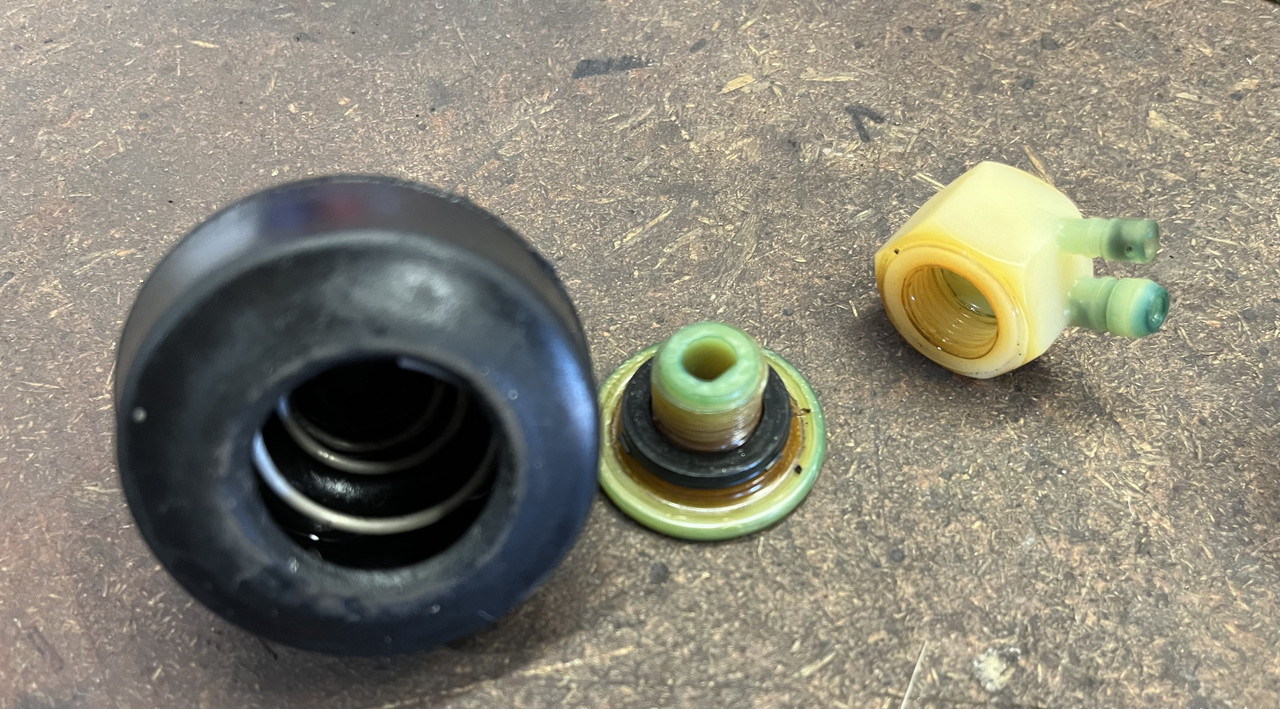
The nylon threads on 1 of mine was burred. So I guess a new bellows had been fitted at one time. Its a common UNF thread (sorry I forgot the size, but maybe 5/8"?) so that was easily cleaned up. The plastic hex nut that contains the 2 hose barbs likewise is worth gently running a lubed tap through while you're at it. I used silicon spray as lube. Good for nylons / plastics / composites etc. I replaced the tap washers (all the old ones had gone hard). They should be about 3mm thick to match the rubber bellows hole thickness of approx 4mm. (as the lip of plinth where the washer locates, sits up about a mm from the wide flat section). The inside of the plinth / screw mount (whatever you want to call it), actually has a squared off shape inside its fluid passage. (like a potentiometer shaft). Good to hold it still whilst threading the plastic barb nut on, but alas with the Bellows installed you cant reach it! :loopy: 
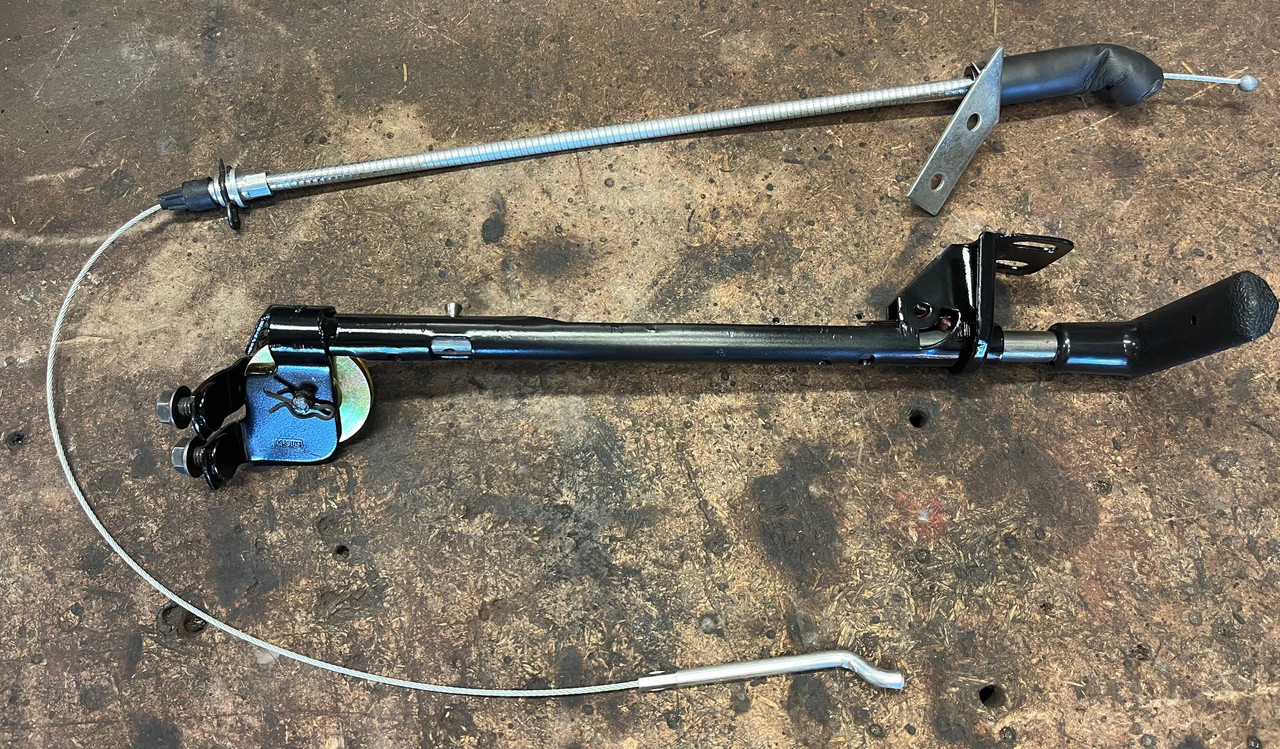
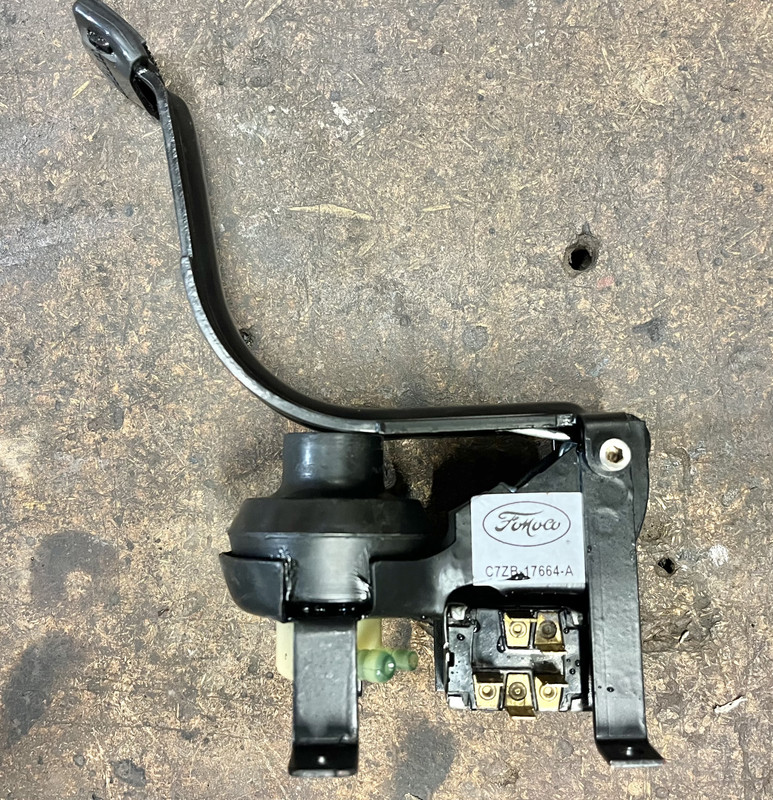
But there is another way to stop it moving... Use an F / G clamp to compress the actuating lever / arm down to the frame, as if you're pumping the lever with your foot. Fully compressed there is just enough tension to do up the nut. So anyway they're assembled! Testing wise, 2 were leak free, one dripped a bit. So I took the advice of a mate in TX and used some black Sikaflex 227 around the base in-between the bellows hole and the washer. Left it go off overnight and voila! Leak free. Final step was fitting new pedal rubbers ($5 each), and printing up new PN tags. Fomoco used plain paper tags it seems. Nothing vinyl or glossy about them. Anyway done!

Image
Image
Image

Amazing how much they fetch on eBay etc. I guess they're getting rare? Unrestored, untested, un-warranted examples going for $130-$350 USD today! Crazy! :shrug:

Ah well at least I have a couple of spares. No fun installing them though, a bit tight down under there. I recommend fitting the wiring plug BEFORE tightening the 4 self tapping screws.
Grumpy old git! 68’ S code Fastback
mungus
Mustang Star
Mustang Star
Posts: 523
Joined: Fri Jun 26, 2015 8:53 pm

Re: Finally - the Bullitt begins! :-)

Post by mungus »

Well that's probably my last post for a wee while as I'm back stateside for work. Taking the opportunity while I'm here to buy a few parts I couldn't get locally and save the crazy postage to OZ. Hope to post again sometime later in Feb. All the best until then.
Grumpy old git! 68’ S code Fastback
hybrid
Mustang King
Mustang King
Posts: 9351
Joined: Tue Jul 27, 2010 2:13 pm
Contact:

Re: Finally - the Bullitt begins! :-)

Post by hybrid »

Enjoy the trip. When will you start the thread asking us what we want brought back from the states? :poke:
mungus
Mustang Star
Mustang Star
Posts: 523
Joined: Fri Jun 26, 2015 8:53 pm

Re: Finally - the Bullitt begins! :-)

Post by mungus »

Yeah yeah yeah. Fat chance. My big wheely bag is already spoken for...
Grumpy old git! 68’ S code Fastback
hybrid
Mustang King
Mustang King
Posts: 9351
Joined: Tue Jul 27, 2010 2:13 pm
Contact:

Re: Finally - the Bullitt begins! :-)

Post by hybrid »

:snigger:
Post Reply