Wheel alignment & suspension
The early Mustang was set up with the American Falcon derived suspension.
The front steering is worm & sector drive steering box connected to a drag link via a pitman arm with an idler arm at the opposite end of the drag link & connected to the front spindles by adjustable tie rods. A ram type power steering was available as an option.
64 - mid 67 had a long shaft steering column that was replaced from the mid 67 model year by a steering box that had a short shaft with a "rag joint" that connected to a collapsible steering column. All this came about during the early Mustang years as the US federal safety laws came into being.
Front suspension was the same basic type through the early years (64½ - 73) however it was improved slightly for the 67 model year and again for the 68 model year.
Basically it is a double A arm concept but actually uses a "caster bar" on the lower arm to form the lower A.
Springing is taken care of by a coil on each side with a shock absorber in the center of the coil. The spring perch is mounted on the top A arm.
While this is a very simple & basic suspension, it has served the Mustang well & can be modified to perform exceptionally well for whatever you need the car to do (street handling/cruising to racing).
Rear suspension is parallel leaf springs that once again have served the Mustang well.
What do want out of your Mustang?
First of all one must make a decision of what the car is primarily going to be used for. There is a huge difference between a suspension set up for a road car as opposed to a circuit/targa or even a drag racing car. Never try to achieve a whole spectrum of available uses for your car as it will only be a compromise in all of them.
I will begin by saying there is no need for any radical suspension changes (inc rack & pinion steering) to achieve a car that will do any of the desired outcomes well. History tells us that this car had no equal.
Radial tyres This was the single biggest change in these cars over the years & most people still do not understand what has to be done to make these cars drive well with modern radial tyres. The early suspensions (I include up to the 73 model year here) were designed for cross ply tyres & later the emerging radial tyre. The caster & anti dive characteristics have to be changed somewhat to allow the modern radial tyre to perform to it's full potential.
I will explain a few terms, that you may or may not understand:
Caster, is the position of the top ball joint in relation to the lower when viewing the car from the side. Positive caster is when the top ball joint is behind the lower, negative caster is when the top ball joint is ahead of the lower ball joint. On a Mustang we are looking for positive caster.
Camber, is the front wheel angle when viewed from the front. A wheel that is angled further out at the top than the bottom is positive camber, a wheel that angles in at the top is negative camber. For a Mustang running radial tyres we dial in some negative camber, never positive.
Toe in or out, The relation of the measurement of the front wheels from center to center when viewed from above. If the front of the wheel measurement is smaller than the rear then it is said that the front wheels have “toe inâ€.
Anti dive, this is something that was worked on a lot with the advent of the radial tyre. It is the motion of the car wanting to “dive†while under heavy braking & can be easily modified while building the car.
Dropping the top A arm or "Shelby Drop", This is a technique that has been developed over the years in racing circles to promote more camber gain as the suspension travels & also to change the roll center of the car. As this has been discussed else where on this website I will not repeat it here.
Setting up the car. The front end is easiest to make changes to while the engine is out. I say this as it allows you access to the towers for the mods that will make it a better handling car.
For a “driver†car I would do the following.
Top A arm location, you could do the "Shelby drop" but that would also entail the use of wedges on the top ball joint. For a well handling car all that is needed is to add some anti dive characteristics to the top A arm by welding the rear location hole & re-drilling it 1/8" (3mm) lower. This changes the angle of the top A arm & promotes smoother braking in so far as the car behaving well under extreme braking.
On all early year cars I shim the top A arm more on the front bolt (3 X 1/8" shims more) to the rear to give more positive caster.
64½ - 66
The difficulty here on the 64½ - 66 cars is that a compromise has to be reached as there is no camber adjustment on the lower arm, so a bit of fiddling has to be done.
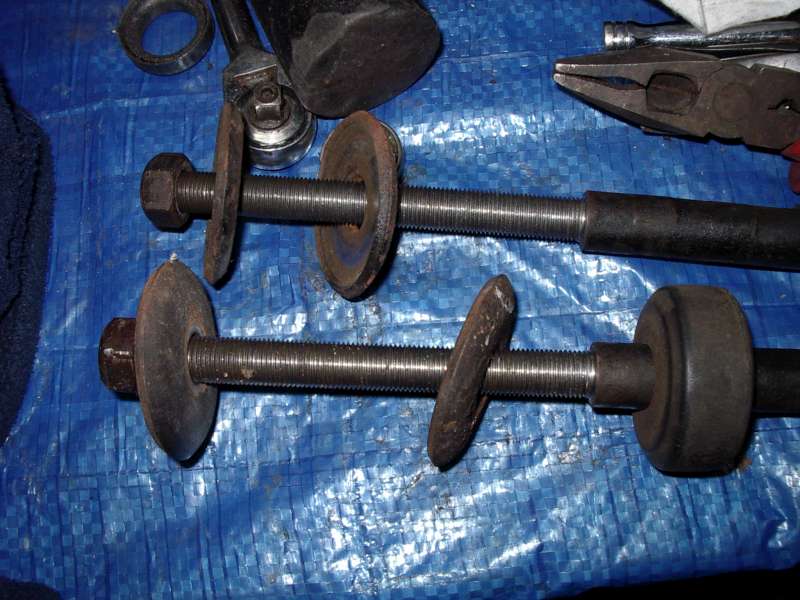
I machine & extend the thread on the caster bar making it adjustable (approximately 150mm total thread length should suffice). This also helps with caster adjustment as well as centering the wheel in the wheel arch. When you do this, make a sleeve that goes on the caster bar that will compress the rubbers 1/8†more than stock. This will firm up the movement of that bar thus preventing the toe in/out to change under load. Jeff (hybrid) has shown pics of this being done. The following picture shows the threads being cut further on the caster bars. You should also machine an angle or rounded edge where the thread meets the castor bars to avoid a weak spot.
If you want to be really radical, then adding camber adjusting pins to the lower arms works well, however welding a section is needed for that to happen. Again that is something for not only a professional welder, but also someone that completely understands suspension.
67 – 73
This is just a matter of doing the anti dive mod described above, adding the 3 X 1/8 shims to the front location bolt of the top A arm (you will need to replace that bolt with one that is 3/8†longer) & the rest is achieved by adjustment.
A good set of springs that are matched to what engine is installed & what you want out of driving the car will be best advised by a professional. Combine that with good shock absorbers (I only like Koni & Bilstein) & sway bar that is also matched to your springing. Remember with sway bars, bigger is not always better, take the professional advice on that one.
Wheel alignment specs on a road car
Caster: I always aim to achieve at least 5 degrees of positive caster (caster will not wear tyres out) & shoot for up to 7 degrees. All this is on cars with power steer.
Without power steer, 3 – 4 degrees would provide heavy steering that the Mrs will hate. So maybe consider power steer if she is to drive the car.
Camber: 0.3 - 0.5 degrees of negative camber will suit your radial tyres.
Toe in: 1/8" (3mm). Make sure you carry out the mod for the tension of the rubbers as described above)
Rear suspension
Stiffer springs are usually only required for racing, on a road car having a decent soft spring (that is capable of holding the back of the car up with rear seat passengers) is all that is required.
Some terms for types of rear springs
Standard eye, springs that have the front bushing wrapped by the spring & departing under the bushing.
Mid eye, springs that have the front bushing wrapped by the spring & departing at the center line of the bushing
Reverse eye, springs that have the front bushing wrapped by the spring & departing over the bushing.
Sliders, the rear of the spring is in a slide, not the swiveling bushing that is standard. (derived from trailer springs)
Setting the height
Again selecting the hardness/softness & determining what ride height is something of a personal preference & is carried out best by a professional.
Rear sway bar is a common accessory that was fitted at the time & still has benefits today. Again get advice as to what setup (springs & sway bar, if needed) for radial tyres.
Lowering blocks, do not use!
Use of blocks increase leverage which allows axle wind up, diff housing should be as close to the spring as possible. If you want the car lower, fit the appropriate springs.
64 - mid 67 had a long shaft steering column that was replaced from the mid 67 model year by a steering box that had a short shaft with a "rag joint" that connected to a collapsible steering column. All this came about during the early Mustang years as the US federal safety laws came into being.
Front suspension was the same basic type through the early years (64½ - 73) however it was improved slightly for the 67 model year and again for the 68 model year.
Basically it is a double A arm concept but actually uses a "caster bar" on the lower arm to form the lower A.
Springing is taken care of by a coil on each side with a shock absorber in the center of the coil. The spring perch is mounted on the top A arm.
While this is a very simple & basic suspension, it has served the Mustang well & can be modified to perform exceptionally well for whatever you need the car to do (street handling/cruising to racing).
Rear suspension is parallel leaf springs that once again have served the Mustang well.
What do want out of your Mustang?
First of all one must make a decision of what the car is primarily going to be used for. There is a huge difference between a suspension set up for a road car as opposed to a circuit/targa or even a drag racing car. Never try to achieve a whole spectrum of available uses for your car as it will only be a compromise in all of them.
I will begin by saying there is no need for any radical suspension changes (inc rack & pinion steering) to achieve a car that will do any of the desired outcomes well. History tells us that this car had no equal.
Radial tyres This was the single biggest change in these cars over the years & most people still do not understand what has to be done to make these cars drive well with modern radial tyres. The early suspensions (I include up to the 73 model year here) were designed for cross ply tyres & later the emerging radial tyre. The caster & anti dive characteristics have to be changed somewhat to allow the modern radial tyre to perform to it's full potential.
I will explain a few terms, that you may or may not understand:
Caster, is the position of the top ball joint in relation to the lower when viewing the car from the side. Positive caster is when the top ball joint is behind the lower, negative caster is when the top ball joint is ahead of the lower ball joint. On a Mustang we are looking for positive caster.
Camber, is the front wheel angle when viewed from the front. A wheel that is angled further out at the top than the bottom is positive camber, a wheel that angles in at the top is negative camber. For a Mustang running radial tyres we dial in some negative camber, never positive.
Toe in or out, The relation of the measurement of the front wheels from center to center when viewed from above. If the front of the wheel measurement is smaller than the rear then it is said that the front wheels have “toe inâ€.
Anti dive, this is something that was worked on a lot with the advent of the radial tyre. It is the motion of the car wanting to “dive†while under heavy braking & can be easily modified while building the car.
Dropping the top A arm or "Shelby Drop", This is a technique that has been developed over the years in racing circles to promote more camber gain as the suspension travels & also to change the roll center of the car. As this has been discussed else where on this website I will not repeat it here.
Setting up the car. The front end is easiest to make changes to while the engine is out. I say this as it allows you access to the towers for the mods that will make it a better handling car.
For a “driver†car I would do the following.
Top A arm location, you could do the "Shelby drop" but that would also entail the use of wedges on the top ball joint. For a well handling car all that is needed is to add some anti dive characteristics to the top A arm by welding the rear location hole & re-drilling it 1/8" (3mm) lower. This changes the angle of the top A arm & promotes smoother braking in so far as the car behaving well under extreme braking.
On all early year cars I shim the top A arm more on the front bolt (3 X 1/8" shims more) to the rear to give more positive caster.
64½ - 66
The difficulty here on the 64½ - 66 cars is that a compromise has to be reached as there is no camber adjustment on the lower arm, so a bit of fiddling has to be done.
I machine & extend the thread on the caster bar making it adjustable (approximately 150mm total thread length should suffice). This also helps with caster adjustment as well as centering the wheel in the wheel arch. When you do this, make a sleeve that goes on the caster bar that will compress the rubbers 1/8†more than stock. This will firm up the movement of that bar thus preventing the toe in/out to change under load. Jeff (hybrid) has shown pics of this being done. The following picture shows the threads being cut further on the caster bars. You should also machine an angle or rounded edge where the thread meets the castor bars to avoid a weak spot.
If you want to be really radical, then adding camber adjusting pins to the lower arms works well, however welding a section is needed for that to happen. Again that is something for not only a professional welder, but also someone that completely understands suspension.
67 – 73
This is just a matter of doing the anti dive mod described above, adding the 3 X 1/8 shims to the front location bolt of the top A arm (you will need to replace that bolt with one that is 3/8†longer) & the rest is achieved by adjustment.
A good set of springs that are matched to what engine is installed & what you want out of driving the car will be best advised by a professional. Combine that with good shock absorbers (I only like Koni & Bilstein) & sway bar that is also matched to your springing. Remember with sway bars, bigger is not always better, take the professional advice on that one.
Wheel alignment specs on a road car
Caster: I always aim to achieve at least 5 degrees of positive caster (caster will not wear tyres out) & shoot for up to 7 degrees. All this is on cars with power steer.
Without power steer, 3 – 4 degrees would provide heavy steering that the Mrs will hate. So maybe consider power steer if she is to drive the car.
Camber: 0.3 - 0.5 degrees of negative camber will suit your radial tyres.
Toe in: 1/8" (3mm). Make sure you carry out the mod for the tension of the rubbers as described above)
Rear suspension
Stiffer springs are usually only required for racing, on a road car having a decent soft spring (that is capable of holding the back of the car up with rear seat passengers) is all that is required.
Some terms for types of rear springs
Standard eye, springs that have the front bushing wrapped by the spring & departing under the bushing.
Mid eye, springs that have the front bushing wrapped by the spring & departing at the center line of the bushing
Reverse eye, springs that have the front bushing wrapped by the spring & departing over the bushing.
Sliders, the rear of the spring is in a slide, not the swiveling bushing that is standard. (derived from trailer springs)
Setting the height
Again selecting the hardness/softness & determining what ride height is something of a personal preference & is carried out best by a professional.
Rear sway bar is a common accessory that was fitted at the time & still has benefits today. Again get advice as to what setup (springs & sway bar, if needed) for radial tyres.
Lowering blocks, do not use!
Use of blocks increase leverage which allows axle wind up, diff housing should be as close to the spring as possible. If you want the car lower, fit the appropriate springs.